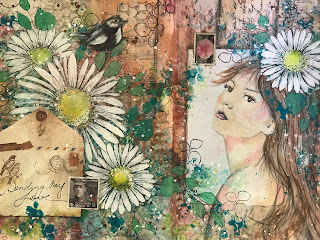
Sending my Love with Daisies
Mixed Media Tutorial - Canvas Version above - Journal Version Below
The month of March saw us creating this piece at Bella Paperie, Quite a few people couldn't make the class due to self isolating restrictions etc.
Hope you take the instructions from here and create your own version of "Daisy"
Happy Creating
Step 1. Cover your entire page or canvas with papers.
I have chosen a letter/postcard and envelope theme.
Use matte medium to adhere your papers making sure to add a top coat over the paper as well. Try to remove any air bubbles as you glue!
When dry apply white Gesso to a piece of bubble wrap, (I like to use a Brayer to spread it out) and then apply the bubble print to random areas of your surface.
If you look at the photo you can just make out the bubble circles on top of the paper.
Step 2 Using a water sprayer , lightly wet the surface , then spray over your work with brown spray ink. I have used walnut ink which i made up in a spray bottle from walnut crystals and water.
You can see the Gesso bubble wrap print acts as a resist. Dry.
Step 3 Print out a laser ink image of a girl profile sketch. You can google images or sketch your own face!
Use the matte medium to glue in place, use a water colour black pencil to extend her shoulder area.
Step 4 Apply different green acrylic paint to your bubble wrap and print in your background foliage . I started with the darkest green, then added lighter shades.
For the face : water down acrylic paint to "wash" in colour. I have used Jo Sonja Skin Tone Base, and usually use a soft filbert brush to apply, while it is damp add a watery pink cheek colour and then highlight with white acrylic. Use a baby wipe to remove anything too heavy. Add the white highlight to eyes, and I have used Jo Sonja Brown earth for eye colour and eyebrows.
For Hair: water down the Brown Earth ( or similar colour) and again apply a wash of paint where you want the hair to go, as you can see i want mine to extend to the end of the piece. Add some white acrylic paint highlights using a liner brush. Use your black water colour pencil to add depth to her hair, add a little water to activate the pencil for shading. Make sure your "Hair" flows in different directions, we don't have perfectly straight hair!
Also use this pencil for any extra shadow on the girls face, under cheekbone, neck etc.
Step 5 I have chosen a daisy stencil from Scrap Divas ( purchase from Australian Ebay) The daisy can be purchased in different sizes.
Use acrylic Titanium White paint for your daisies, either stencil with a brush or makeup wedge sponge.
I then have used my finger to apply yellow the the centers, you may like to dab an orange colour for depth and white for highlight.
When my first stencil layer is dry I have then used a small paintbrush to add a second painted layer to petals, start from the outer edge of petal and quickly stroke towards center, paint does not have to go all the way, mainly highlighting the tips of petals.
I also later on added a shadow float of colour from the center onto the daisy petals
( see finished photo)
I have used my own hand made leaf stencil for the extra foliage and have chosen a green acrylic paint that will stand out from the background. Of course you can handpaint your leaves, you don't have to use a stencil.
Step 6
Using a fan brush, speckle thinned white and then brown paint over your project. Avoid getting it on the face though, unless you want freckles!
I have chosen a outline leaf stamp to add to the design. I used Versafine black ink pad. I also stamped a little birdie onto the flower. When it is dry go over the bird shape in black acrylic paint and then add white highlights for eyes and wing with a small paintbrush.
Add your small envelope to the project using matte medium. You can make your own envelope if you don't have a ready made one.
Use a fine tip waterproof black pen to add words to your envelope, mine says "Sending my Love". Use this same black pen to outline all your daisy petals and leaves, add some detail dots and squiggles to the centers.
Our last finishing touches are to add real postage stamps to our project, float a little yellow colour around girls face to highlight.
Use the black pencil to add some shade around the envelope, stamps and birdie. If you are creating in a journal, you may like to darken the edges by running a brown ink pad around them, if using a canvas, paint in the edges with a brown paint.


Raw Pressed hemp cones are quickly becoming a preferred choice for people who value a natural and smooth experience. Made from unrefined hemp fibers and crafted without harsh chemicals, these cones offer a cleaner and more eco-friendly alternative to traditional options. What really stands out about Raw Pressed hemp cones is their slow, even burn and mild, earthy flavor that doesn’t overpower the contents. They’re also pre-rolled for convenience, saving time while ensuring consistency in shape and airflow. For those who care about sustainability and purity, Raw Pressed hemp cones perfectly balance quality, performance, and a more natural lifestyle choice.
ReplyDeleteFor more visit below links
Rose petal wraps
Hemp Blunts
Blazy Susan cones