Posts
Showing posts from 2016
"Covering" a Mixed Media Tutorial
- Get link
- X
- Other Apps
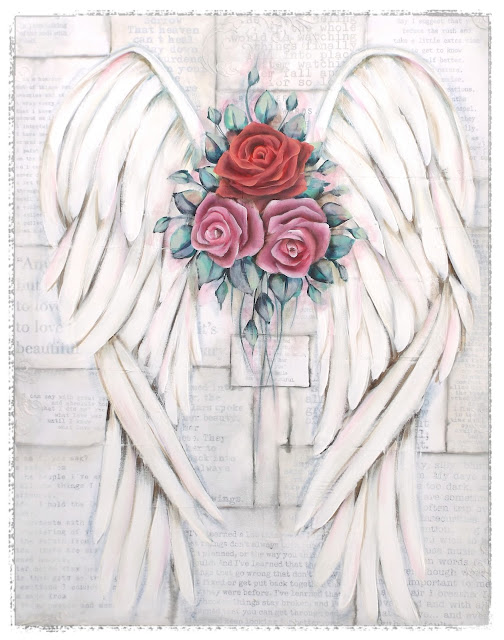
"Covering" I have wanted to paint this canvas for ages! I love the imagery of heartfelt words, brave courageous statements of vulnerable hearts being covered by the wings of peace and protection. Be free to express who you are and how you feel. Psalm 91 v 4 "He will cover you with his feathers. He will shelter you with his wings" Step 1. Print out laser copies of your favourite quotes, poems and sayings, adhere them to your canvas using #Decopage Matte Medium When dry add a thin layer of Gesso over your words. Step 2. Using a graphite pencil , draw in your wing shape, Basecoat your wings in a neutral Grey. I have used #Americana DECOR Chalky Finish in the colour Yesteryear. Next add shadows in Burnt Umber. Step 3. Using the graphite pencil, outline the paper quotes in the background, add water on a brush to smudge around the corners. Start to paint in your feathers individually, first with...
Workshop Wednesday Transformation of Cardboard Folders
- Get link
- X
- Other Apps
This is my version of a makeover for Cardboard Folders for the office. Start with plain folders. I found these at Kmart for $2 each. Bargain! Glue some music paper or other collage paper to the front of folder, I have used #Decopage Matte Medium Choose a stencil and apply design repeatedly over the front and side of folder using Gesso and a makeup sponge. The Gesso will act as a resist for our project. Choose another stencil and apply texture paste through stencil, leave to dry. I used a Stencil Girl floral mask on this folder. Next choose at least three/four spray ink colours. I have used a combination of Dylusion Sprays and Kaisercraft Sprays. Keep spraying over your design in different colours, adding water with a spray bottle, allowing some colours to run into each other. Keep the middle section fairly clear for where your inspirational words will be placed later on. If you wish to lighten the intensity of t...
Workshop Wednesday Vintage Style " Don't Be Afraid of Change" Canvas Tutorial
- Get link
- X
- Other Apps
Step 1. Start with a canvas (20cm x 30 cm) that have been collaged with papers that you love. I have chosen a black and white theme using paper napkins, tissue paper, paper doily and some Tim Holtz idea-ology music paper. I have used #Decoart Decoupage medium to adhere paper to canvas. Step 2 Brush on a little Gesso here and there to blend out the background. Block in circles for your roses. Step 3 Use a filbert brush with washes of Olive green, Vines and Raindrop ( Jo Sonja Artist Colours) for the leaves. Add rose shadows in Burnt Umber. Step 4 Load the filbert brush (or angle brush) with your rose colour and Warm White, Paint in the strokes around the Burnt Umber center first, then work outwards for side and bottom petals. Step 5 Choose your printed vintage image, cut out the shape and use the Decopage medium to adhere to canvas. Do the same with your printed paper butterflies. Draw in the butterflies feele...
Mt Tamborine " Craft Extravaganza" Friday6th through to Sunday8th May 2016
- Get link
- X
- Other Apps
Workshop Wednesday- " Sing a Little Louder" Mixed MediaTutorial
- Get link
- X
- Other Apps
"Sing a Little Louder " Mixed Media Tutorial I have created this piece on Canvas 30 x 40 cm But the project would also work on Journal paper. Step 1. Collage pieces of old music sheets and paper doilies. I use # Decopage Matte Medium Step 2 Choose your stencil and sponge the image with Gesso Step 3 Use spray inks over your canvas. I have used Kaisercraft inks Step 4 Spray with water and let the inks do their thing! Step5 Apply more stencils #Tim Holtz, over your canvas with Texture Paste Step 6 I have used Butterfly stamps by Kaisercraft, Stamp out onto lunch wrap paper using Black Stazon ink, cut out and glue onto canvas. Choose a paper napkin with flowers, peel off the backing and collage onto your canvas. Step 7 Load your filbert paintbrush In Titanium White and highlight the flowers. Paint in a few extra leaves using Jade and Titanium. Dyrbrush the larger butterfly wings in Titanium. Add s...
Mothers Day, Art and Craft Exhibition Sale - Coming Up Soon
- Get link
- X
- Other Apps
If you would like to purchase an Original Artwork from Me, I will be participating in the Mt Tamborine "Craft Extravaganza" This is held in Main Steet, North Tambourine from the 6-8 May 2016 I only attend a few shows a year, so here is your chance to own something from my "Vintage Romance" Collection.
Workshop Wednesday Tutorial- Mixed Media on Heart Shaped box
- Get link
- X
- Other Apps
Ballerina Box Start by choosing your Cardboard or Paper Mache box to work on. Take a piece of lace big enough to cover your box lid and scrape Texture Paste using a palette knife through the lace, lift lace carefully, decide where your image transfer is going the smooth that area of texture down with your knife and leave to dry. Choose a laser copy of an image you want to use. I chose a vintage ballerina from Graphics Fairy. Cut around the image and apply Deco-Page Medium# ( Deco Art product) to the surface and to your inked image, apply to box and leave to dry for a few hours. Use a water spryer to dampen image and begin to rub the backing paper to reveal your transferred image, be gentle with your rubbing to avoid tears. Paint in your roses around your image using a 1/2" Angle brush, same brush to paint in leaves, Hightlight leaves with Titanium White, add shadow of pink on some,Raw Umber on others, paint in thin ribbons amongst the roses with ...